
Installing NodeJs in Raspberry Pi and creating an executable file with JavaScript
The easiest way to install NodeJs in Raspberry Pi is to install it with the help of Node Version Manager. Let us see how to install NodeJs and create an executable file with JavaScript.
Install NodeJs In Raspberry Pi
Follow the steps to install Node Version Manager (NVM). NVM also allows installing multiple versions of NodeJs side by side.
To install NVM, execute the below command in the terminal.
“curl -o- https://raw.githubusercontent.com/nvm-sh/nvm/v0.39.1/install.sh | bash”
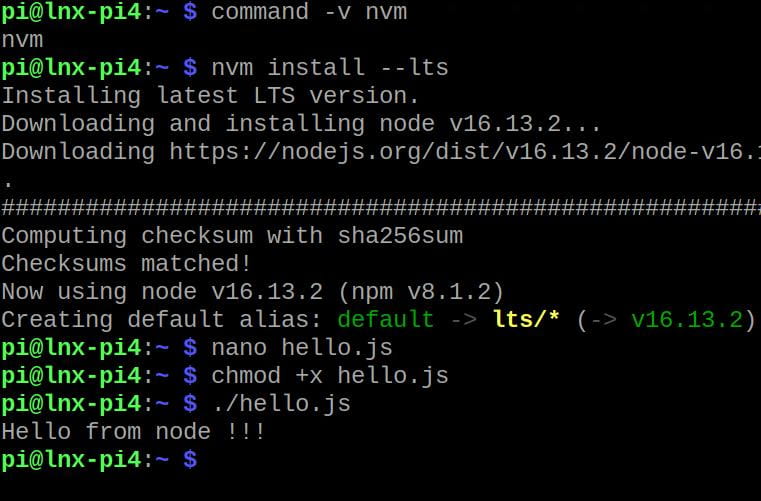
Close the terminal and open it again. Validate the installation by executing the command “command -v nvm” and ensure that it is returning “nvm” as output.To install the latest LTS version of Node Js, execute the command “nvm install --lts” in the terminal. For installing the latest version of NodeJs, execute the command “nvm install node” in the terminal.
To install a specific version of NodeJs in Raspberry Pi, execute the command “node install [version number]“. For switching versions of Node Js, run the command “nvm use [node or version number]” in the terminal. To set a specific version as a default version of node, execute the command “nvm alias default [node or version number]“.
Executable With JavaScript
To create a simple “Hello World” executable in JavaScript, create a file by “nano hello.js” add the bellow code to that file.
#!/usr/bin/env node
console.log('Hello from node !!!');
Save and exit the file. Next change the permission of the file by executing the command “chmod +x hello.js“. That’s it, now you can execute the file by calling the calling “./hello.js” in the terminal.
Leave a comment